
Part 3 of our five part series, ‘Measuring, Marking & Layout for Beginner Woodworkers‘
The Art of the Line: Why Clean Marks Matter More Than Perfect Measurements
In our last two posts, we established a golden rule for the shop: Accuracy doesn’t come from reading numbers; it comes from controlling references. But once you have your reference, how do you communicate that information to the wood? This is where many beginners stumble. They treat marking as a quick “to-do” before the real work starts. Experienced woodworkers, however, view marking as a craft of its own.
The truth is simple: You don’t cut to a measurement. You cut to a line. If that line is fuzzy, thick, or misplaced, even the best saw in the world won’t save your project.
The Anatomy of a Bad Line
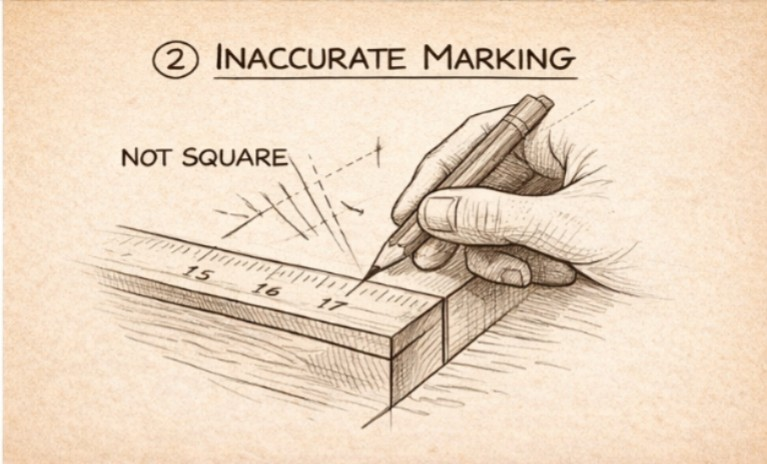
Before we talk about the tools, let’s look at the enemy. A poor layout line is usually:
- Thick: Creating a “gray area” where you have to guess which side to cut.
- Fuzzy: Hard to see under shop lights or through sawdust.
- Inconsistent: Lighter in some spots and deeper in others.
The Goal: A good marking tool creates a line that is unambiguous, falls exactly where the cut should stop, and—crucially—physically guides the tool that follows.
Pencil vs. Knife: Choosing Your Weapon
The biggest jump a woodworker makes in their accuracy is knowing when to put down the pencil and pick up a knife.
1. The Pencil (The Generalist)
Pencils are familiar and forgiving. They are perfect for rough layout, marking “X”s on waste wood, or labeling your parts so you don’t lose track of which side is the “face.”
🪵 From the Bench: Early in my journey, I used a standard carpenter’s pencil for everything. I remember staring at a layout line that was nearly 1/8″ thick and wondering, “Do I cut on the left side, the right side, or right down the middle?” I chose the middle, and the resulting tenon practically fell through the mortise. Now, I save the big pencils for framing and keep a 0.5mm mechanical pencil for the fine stuff.
- The Pro-Tip (The Sandpaper Sharpener): Don’t bother with a standard pencil sharpener. Keep a small scrap of 220-grit sandpaper on your bench. Rub the side of your pencil lead against it at a shallow angle to create a “chisel point.” This flat edge allows the lead to ride perfectly flush against your square, giving you a line that is exactly where it needs to be.
2. The Marking Knife (The Specialist)
A marking knife doesn’t just draw a line; it severs the wood fibers, creating a physical track in the material.
💡 The “Aha!” Moment: The first time I used a marking knife for a joint, I finally understood the hype. I felt the chisel literally “click” into the knife line like a key into a lock. There was no more guessing where the edge was. That “click” is the sound of a perfect fit before you’ve even removed a single shaving.
- The Advantage: It creates a microscopic “V” groove. When you go to saw or chisel, your tool has a physical registration point to start from.
- The Warning (Beware the “Grain Steer”): Be careful when knifing with the grain. A sharp knife loves to follow the wood’s fibers rather than your steel square. On your first pass, use “ghost pressure”—barely touching the wood—just to establish a track. On the second and third passes, you can lean in to deepen the mark.

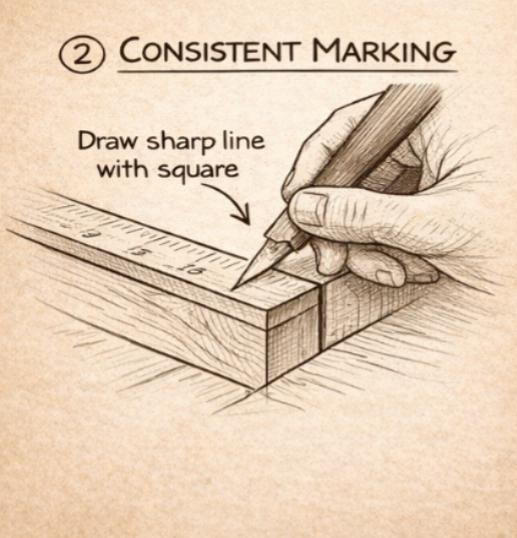
A Universal Habit: Use the “Crow’s Foot”
Regardless of which tool you choose, stop making single “tick” marks. A single vertical line can lean left or right, leading to error.

Instead, use a Crow’s Foot. Draw two small lines that meet at a point (a “V”). The point of that V is your exact measurement. It’s impossible to misinterpret, even in a dimly lit shop, and it ensures your square is placed with 100% certainty.
Your Essential Marking Toolkit
You don’t need a dozen tools to get started. Focus on these three:
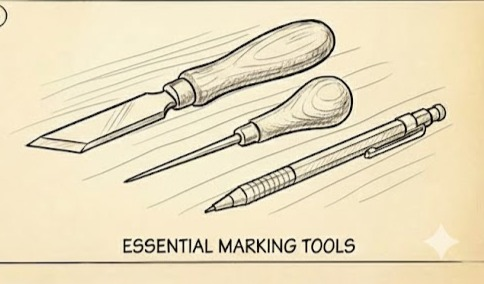
| Tool | Best Used For… | Why It’s Great |
| Marking Knife | Joinery layout (dovetails, tenons), shoulder lines, and cross-grain cuts. | Physically severs wood fibers to prevent tear-out and creates a “track” for saws or chisels to “click” into. |
| Scratch Awl | Marking hole centers and hardware locations. | Creates a pilot “dimple” so your drill bit doesn’t wander. |
| Mechanical Pencil | Rough layout, non-critical cuts, and writing notes on stock. | Familiar and easy to erase; a hard lead (4H–6H) or mechanical pencil provides a consistent, thin line. |

Three Habits for Perfect Layout
1. Always Mark the “Waste Side”
This is the most important habit you can build. A layout line represents a boundary. One side is your “keep” piece; the other is “waste.”
- The Rule: Always place your mark so the blade removes material from the waste side, leaving the line itself physically on the finished piece. If you cut the line away, you’ve lost your reference.
2. One Deliberate Stroke
Avoid “coloring in” your lines. For a knife, make one light pass to establish the track, then a second, firmer pass to deepen it. This prevents the grain of the wood from pulling your blade off course.
3. “Knife Walls” for Hand Tool Work

If you are sawing by hand, use your marking knife and a chisel to create a small “trench” on the waste side of your line. This “knife wall” acts as a track for your saw, making it almost impossible to start the cut incorrectly.
The “Thinking” Step
Marking is your final chance to catch a mistake before you commit to a cut. Many pros use a “Strike and Sit” method: they mark their lines, then literally sit back for a moment to visualize the joint.
Does the orientation look right? Is the waste on the correct side? It is much easier to sand away a pencil mark than it is to grow back a half-inch of oak.
Coming Next: Post 4
Now that you know how to make a mark, we need to ensure those marks are square, consistent, and repeatable. In the next post, we’ll dive into Layout Tools—squares, gauges, and dividers—and how to use them to move measurements around your project without ever picking up a tape measure.