Hand Saws — Choosing the Right Saw for the Cut
Welcome To Post 4 Of Our Series: BUILT BY HAND: A BEGINNERS GUIDE TO HAND TOOLS
Walk into any tool store and you’ll find a wall of saws. Rip saws, crosscut saws, panel saws, backsaws, Japanese saws, coping saws — it’s easy to feel overwhelmed. The reality is simpler than it looks. Most of these saws exist because wood behaves differently depending on the direction you cut it, and different tasks call for different blade geometries.
Once you understand the basic distinctions, the right saw for any job becomes obvious.
With the Grain vs. Across the Grain
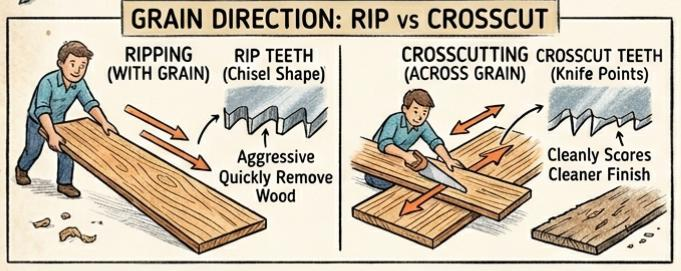
This is the fundamental division in hand saw design. Ripping means cutting along the length of a board, parallel to the grain. Crosscutting means cutting across the grain, like shortening a board to length.
Rip saw teeth are shaped like little chisels — they cut aggressively with the grain and remove wood quickly. Crosscut teeth are shaped more like knife points — they score across the fibers cleanly instead of tearing them. Using a rip saw to crosscut a board leaves a rough, torn edge. Using a crosscut saw to rip a board works, just slowly.
In practice, most beginners get by with a good crosscut saw that handles both tasks reasonably well. The rip saw becomes important when you’re doing a lot of ripping, such as sawing boards to width from wider stock.
TPI — What It Means and Why It Matters
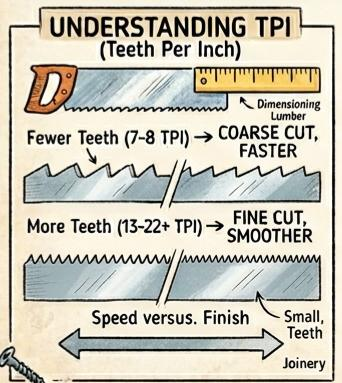
TPI stands for teeth per inch. More teeth per inch means a finer, smoother cut; fewer teeth means a faster but rougher cut. For rough dimensioning, 7-8 TPI is typical. For joinery, you want 13-22 TPI or more.
The tradeoff is speed versus finish quality. You wouldn’t want to cut a dovetail with a coarse rip saw, and you’d lose patience quickly trying to dimension rough lumber with a fine backsaw.
The Panel Saw
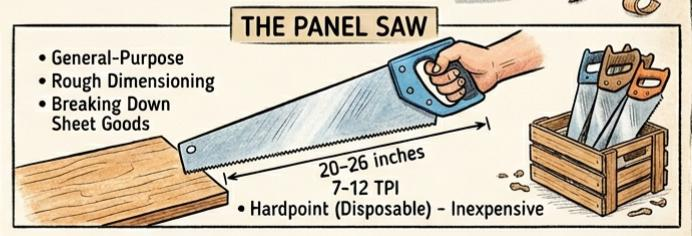
A panel saw is your general-purpose handsaw for rough dimensioning — cutting boards to length, breaking down sheet goods, and similar tasks. These are long saws with handles, typically 20 to 26 inches, with 7 to 12 teeth per inch depending on the intended use.
For most beginners, a basic hardpoint crosscut panel saw is the right choice. These are inexpensive and disposable when dull (the hardened teeth can’t be resharpened by hand), which removes the burden of saw maintenance while you’re still learning. A good plastic-handled hardpoint saw cuts well and costs very little.
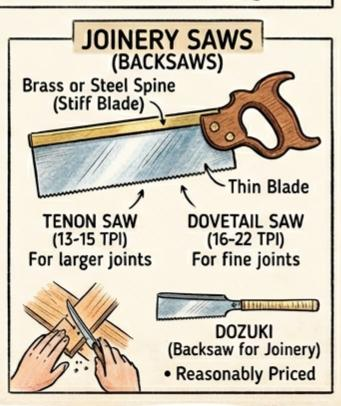
Backsaws
Backsaws are the joinery saws. They have a strip of brass or steel folded over the back of the blade, which keeps the blade stiff and allows for the thin, finely set teeth needed for precise cuts. The tenon saw is the largest of the family (13-15 TPI), used for cutting tenon cheeks and similar larger joints. The dovetail saw is smaller and finer (16-22 TPI), ideal for cutting dovetails and other fine joints.
These are the saws where quality matters. A good backsaw tracks straight, starts easily, and leaves a clean kerf. A poor one wanders and frustrates. If budget allows, invest here.
Japanese Saws
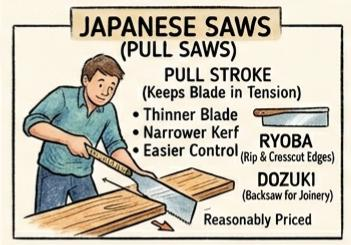
Japanese pull saws cut on the pull stroke rather than the push stroke, which allows for a much thinner blade and a narrower kerf. Many woodworkers — especially beginners — find them easier to control than Western-style saws, since the pull stroke naturally keeps the blade in tension.
A ryoba saw has both rip and crosscut teeth on opposite edges of the same blade. A dozuki is a Japanese backsaw for joinery work. Both are excellent tools and typically very reasonably priced.
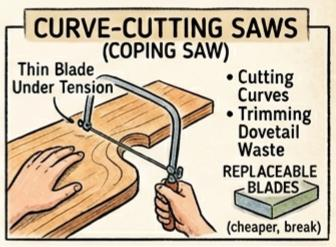
Curve-Cutting Saws
For cutting curves, the coping saw is the standard choice. It has a thin blade under tension in a bowed frame and handles curves in boards up to about an inch thick. You’ll use it regularly for trimming dovetail waste and rough-cutting curved shapes. Blades are cheap and replaceable, which is good because they break occasionally.
Basic Saw Technique
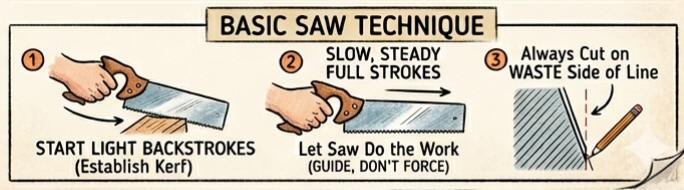
Start any cut with short, light backstroke pulls to establish the kerf. Once the kerf is set, use the full length of the blade with slow, steady strokes. Let the saw do the work — you should be guiding it, not forcing it. If you find yourself pushing hard, the blade is either dull or you’re fighting the grain.
Always cut on the waste side of your marked line, not through it. That line represents finished dimension; the saw kerf should fall entirely in the waste.