
Post 5: Practical Layout Strategies — From Board to Build
Welcome to Part 5 Of Our Five Part Series: Measuring, Marking & Layout for Beginner Woodworkers
At this point in our series, you’ve learned how measuring really works, how to mark clearly, and how to use layout tools to reduce error. Now, it’s time to put it all together.
This final post focuses on real-world layout strategies—the kind you’ll use every time you build something, from a simple shelf to a fine piece of furniture.
Start With Reference Faces (Every Time)
Before you measure or mark anything, you must establish your references. This is the most critical step in accurate layout.
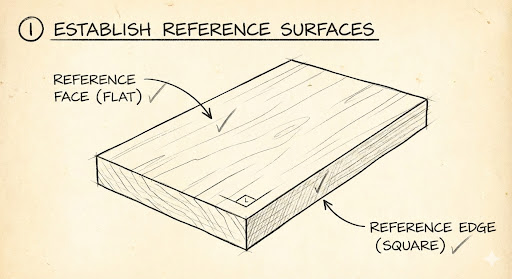
Mark them lightly with a pencil so you don’t lose track.
Choose one face as your reference face.
Choose one adjacent edge as your reference edge.
All subsequent layout lines must originate from these two surfaces. This prevents errors caused by uneven thickness, bowed boards, or out-of-square edges. If you skip this step, accuracy becomes accidental.
Laying Out Boards to Length
When you need multiple boards cut to the same length, don’t measure each one individually.
Use it as a “story stick” or physical reference to mark the rest.
Measure once on your first board.
Mark that board carefully.
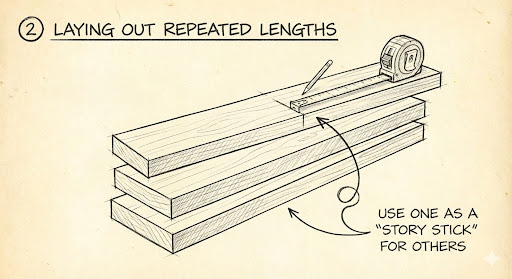
This simple trick avoids the cumulative errors that come from repeated measuring and ensures consistency across all your parts. For repeated lengths, a physical reference beats a number every time.
Layout for Joinery
Joinery layout is where accuracy is most critical. It works best when you mark both mating parts from the same reference, using gauges instead of rulers.
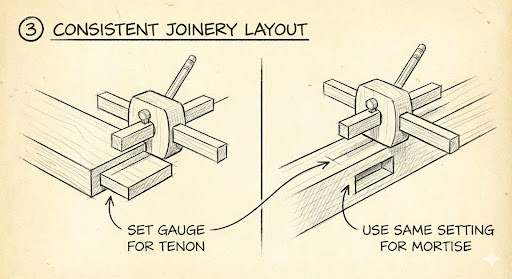
For example, to lay out a mortise and tenon joint:
Set a marking gauge to the desired tenon thickness.
Use that same gauge setting to mark both the tenon cheek and the mortise wall, referencing from the same face on both pieces.
Let the tool enforce consistency. This is how joints fit perfectly—even when the numbers aren’t.
Avoiding Cumulative Error
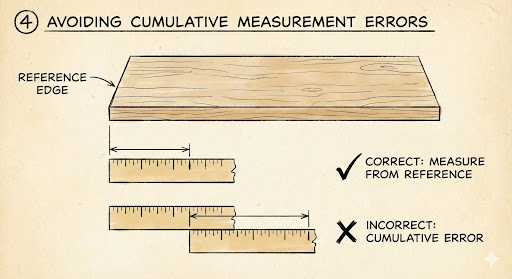
Cumulative error is a common pitfall. It happens when you “measure from the last mark” or flip boards without re-referencing. To avoid it:
Reset your tools for each measurement rather than stacking them.
Always measure from the reference edge.
Woodworking rewards a methodical process, not speed. Taking the time to measure correctly from your reference point will save you from a world of frustration later.
Layout as a Thinking Step
Layout is not just preparation; it’s problem-solving. Before you make a cut, take a moment to ask yourself:
- Does this layout make sense?
- Are all parts referenced the same way?
- Have I marked the waste clearly?
- Could this cut go wrong if I rush it?
A few extra seconds of thought here can save you hours of fixing mistakes later.
A Simple Beginner Workflow
A reliable layout workflow that scales from beginner projects to fine furniture looks like this:
- Mill boards flat and square.
- Choose and mark your reference face and edge.
- Lay out all related parts together.
- Double-check your layout.
- Cut with confidence.
The Big Takeaway
The most important lesson from this series is that accuracy in woodworking doesn’t come from expensive tools or perfect math. It comes from:
- Clear references.
- Consistent layout.
- Calm, deliberate steps.
If you learn to trust your layout, your cuts will follow.
Series Wrap-Up
This series was designed to give you confidence with basic tools, a repeatable layout process, and fewer surprises at the bench. Measuring, marking, and layout aren’t flashy, but they are the foundation of everything you will ever build.