
Part Two of our five part series, ‘Measuring, Marking & Layout for Beginner Woodworkers‘
The Secret to Accurate Woodworking: Mastering Reference Faces & Edges
Ever wonder why your joints never seem to align perfectly, even though you measured them three times?
If you ask experienced woodworkers how they get parts to fit so reliably, most won’t talk about how carefully they read their tape measure. Instead, they’ll talk about reference faces and reference edges.
This concept is one of the most important—yet least understood—ideas in woodworking layout. It is the difference between struggling with every joint and having your assemblies come together neatly.
Once you grasp this concept, many common beginner frustrations simply disappear.
What Are Reference Surfaces?
Wood is rarely perfect. Even “dimensioned” lumber from the home center can vary slightly in thickness or width along its length. If you measure from random spot to random spot, those imperfections translate into inaccuracies in your final project. To combat this, we establish “reference surfaces.”
1. The Reference Face
A reference face is the single surface of a board from which all other measurements regarding thickness and joinery depth are taken. It is not necessarily the prettiest face of the board. It is the flattest, most stable face you can establish early in the process (usually using a jointer or hand planes).
Every dimension that matters must originate from this face. If you measure a tenon shoulder from the reference face, but measure the matching mortise from the opposite (non-reference) face, even a tiny variation in board thickness will cause the joint to be misaligned.
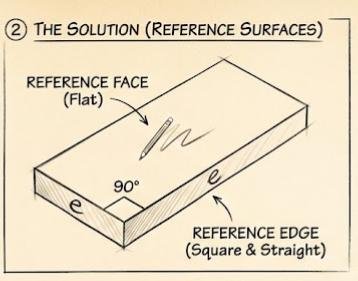
2. The Reference Edge
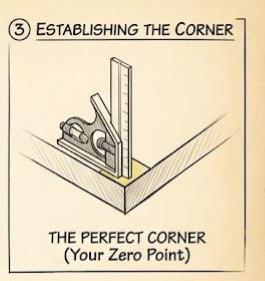
A reference edge is the straight, square edge that is perfectly perpendicular (90 degrees) to the reference face. Together, the reference face and reference edge form a perfectly reliable corner. This corner is your “zero point”—the starting line for all layout.
When your boards are prepared and marked this way:
- Parts match more easily.
- Joints align naturally.
- Squareness becomes repeatable across the whole project.
Why Measuring from “Wherever” Causes Problems
The primary reason beginners struggle with accuracy isn’t their measuring tools; it’s their lack of a consistent reference.
When you take measurements from opposite faces, different edges, or surfaces that haven’t been squared, small differences add up fast.
Here is the golden rule: If you flip a board end-for-end or face-to-face while laying out parts, you have lost your reference.
Even a 1/32″ variation, multiplied across several parts of a frame or cabinet, will show up as a glaring gap or twist in the final assembly. Professional-looking work isn’t about absolute perfection—it’s about absolute consistency.
How to Establish and Mark Your References
For almost every furniture project, you should follow this sequence before you ever touch a tape measure:
1. Flatten One Face
Use your jointer, planer, or hand planes to get one face dead flat. This is now your Reference Face.
2. Square One Edge
Make one edge perfectly straight and 90 degrees square to your Reference Face. This is now your Reference Edge.
3. Mark Them Clearly (Crucial Step!)
You must mark these surfaces immediately so you don’t lose track of them.
- The Simple Way: Put a distinct pencil squiggle or a cursive “f” on the reference face, and an “e” on the reference edge.
- The Pro Way (The Cabinetmaker’s Triangle): When arranging several boards that will be glued together (like a tabletop), draw a large triangle across all the boards at once. This single mark identifies the reference face of every board and simultaneously shows you their orientation and order.
From this point forward, every measurement and layout line is taken from those marked surfaces—no exceptions.
The Payoff: Predictable Layout
Once adopting reference faces and edges becomes a habit, the way you work changes dramatically. Layout becomes faster and, more importantly, predictable.
- You will stop chasing errors and start preventing them.
- Your mortises will align with your tenons.
- Your shelves will actually fit into their dadoes without gaps.
- Your frames will stay square during glue-up.
This single concept will improve every project you build, no matter how simple or complex. Stop measuring from random surfaces, establish your references, and watch your accuracy improve immediately.
Coming Next
In Post 3, we’ll look at marking tools—why pencils often fail beginners, when to use a marking knife, and how clean layout lines make cutting easier and more accurate.