From Brain to Shop Drawing: The Art of Planning Your Build
Welcome To Part 3 Of Our 5 Part Series, The Woodworker’s Eye: From Concept to Creation
In our previous posts, we’ve defined the Function of your piece and ensured its Structural Integrity. You know what you’re building, who it’s for, and how to keep it from collapsing. Now comes the bridge between the idea in your head and the wood on your workbench: The Plan.
Many beginners make the mistake of rushing this step. They have a vague idea and head straight to the saw. This almost always leads to wasted wood, frustration, and a project that doesn’t look quite right. A good plan is your roadmap; without it, you’re just driving around hoping to find your destination.
This post will guide you through the process of turning a concept into a concrete, actionable plan, using traditional methods and modern tools.
The Project Roadmap

Before we dive into the specifics, it helps to visualize the journey. Your project doesn’t just jump from an idea to a final build. It goes through a series of stages, each one refining the design and catching potential problems.
As shown in the roadmap below, you start with a loose idea, refine it into a sketch, convert it into a Shop Drawing, and sometimes even build a practice version before committing to expensive lumber.
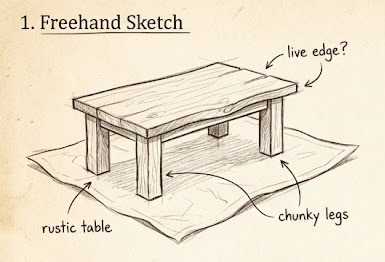
1. The Freehand Sketch: Dreaming on Paper
Every great project starts with a doodle. This is the oldest and most intuitive method of design. You don’t need to be an artist; you just need to get the idea out of your head and onto paper.
Freehand sketching is about exploring possibilities. It’s where you decide on the overall shape, proportions, and style. Don’t worry about exact measurements yet. Focus on the “look and feel.” As you draw, your brain starts to work through the construction process, connecting you with the craft before you even touch a tool.
Tip: Keep a notebook handy. Great ideas often come when you least expect them. Sketch on napkins, backs of envelopes—anything works!
2. The Shop Drawing & Cut List: The Engineer’s Approach
Once you’re happy with your sketch, it’s time to get serious. You need to translate your artistic vision into a mathematical plan. This is where you create a shop drawing and a cut list.
A shop drawing is a technical drawing with precise measurements for every single part. It shows you how everything fits together, like a puzzle. This is where you apply the anthropometric data you learned about in Post 1 and the structural rules from Post 2.
The cut list is a simple spreadsheet that lists every piece of wood you need, its quantity, material, and exact dimensions. This is your shopping list for the lumber yard and your checklist for the workshop. It is the embodiment of the golden rule: “Measure Twice, Cut Once.”
- Tip: When making your cut list, always add a little extra length to your rough cuts to account for mistakes and final trimming.

3. Embracing Technology: CAD Designing
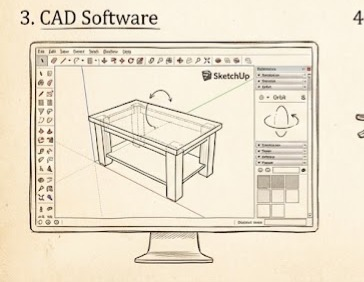
In the modern woodworking world, the pencil has a powerful partner: Computer-Aided Design (CAD). Software like SketchUp allows you to build a 3D model of your project virtually.
The biggest advantage of CAD is the ability to make changes instantly. Don’t like the leg taper? Change it in seconds without needing an eraser. Want to see how it looks in walnut instead of oak? Click a button. You can rotate the model to see it from every angle, catch collisions between parts, and even generate your blueprints and cut lists automatically.
While there is a learning curve, the time you save by avoiding mistakes in the shop is well worth it.
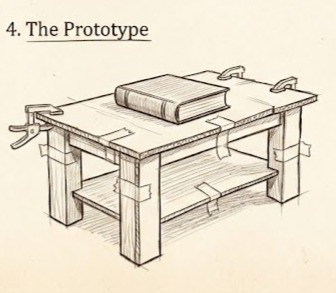
4. The Prototype: Your “Draft” Copy
Sometimes, a drawing isn’t enough. If a project is complex, involves tricky joinery, or if you’re just unsure about the proportions, build a prototype.
A prototype is a full-scale or scaled-down mock-up made from cheap materials like scrap wood, cardboard, or MDF. It allows you to test your design in the real world. Does the chair feel comfortable? Is the table too wobbly? Is that joint actually impossible to assemble?
Finding these problems on a $29 sheet of plywood is a lot better than finding them on $500 worth of cherry. Don’t be afraid to build a “draft” version first.
In the next post, we will move from planning to the materials themselves. We’ll explore how to choose the right wood for your project, understanding grain, movement, and why some woods are better suited for certain tasks than others.