The Invisible Hero: Understanding Structure and Physics in Woodworking
Welcome To Part 2 Of Our 5 Part Series. The Woodworker’s Eye: From Concept to Creation
In our last post, we talked about Function—designing furniture that fits the human body and serves a specific purpose. You now know what you want to build and who you are building it for.
But there is a nightmare scenario that haunts every beginner woodworker. You spend weeks selecting lumber, cutting joinery, and applying a finish. You bring the piece into your home, set it down, and… wobble. Or worse, you sit on the chair, and it groans. Or you load books onto the shelf, and it smiles back at you (sags) within a week.
Design is not just about making things look good; it is about making things stay put.
Welcome to Part 2 of our series. Today, we are putting away the artist’s beret and putting on the engineer’s hard hat. We are going to discuss Structural Integrity. This might sound like dry physics, but understanding how wood reacts to gravity and pressure is the secret to building heirlooms that last for generations rather than firewood that lasts for a season.
The Three Forces: What is Trying to Break Your Furniture?
To build strong furniture, you have to know your enemy. Gravity is constant, but the way it interacts with wood changes based on the design. According to the laws of mechanics, there are three main forces you need to worry about.

1. Compression
This is the crushing force. Think of the legs of a heavy workbench or a stool. The weight pushes straight down, trying to squash the wood fibers. Luckily, wood has incredible compression strength along the grain. You could stack a car on top of a 4×4 post, and it wouldn’t crumble. Woodworkers rarely have to worry about wood failing under compression unless the piece is incredibly thin.
2. Shear
This is the sliding or snapping force, and it is the most dangerous one for furniture designers. Shear happens when downward pressure opposes a rigid support.
- Example: Imagine a table leg attached to an apron. If someone sits on the edge of the table, the leg pushes up (from the floor) while the weight pushes down. The point where they meet is under shear. If the joint isn’t strong enough, the wood will split, or the joint will snap.
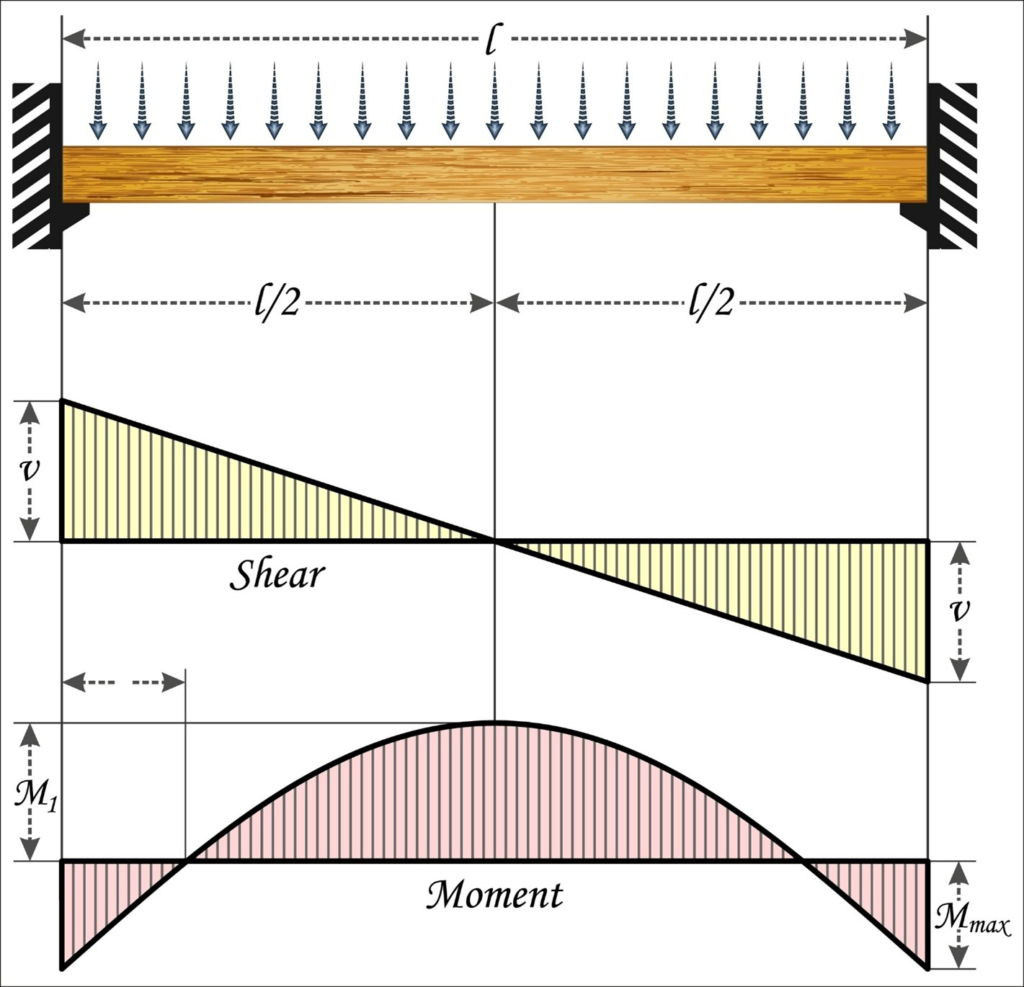
3. Tension (Moment)
This is the pulling force. Imagine a game of tug-of-war. If you have a shelf loaded with heavy encyclopedias, the bottom edge of that shelf is actually stretching—it is under tension. Wood is strong in tension, but glue joints are not always as forgiving.
The Beam Theory: Stopping the Sag
Let’s tackle the most common structural problem: The Sagging Shelf.
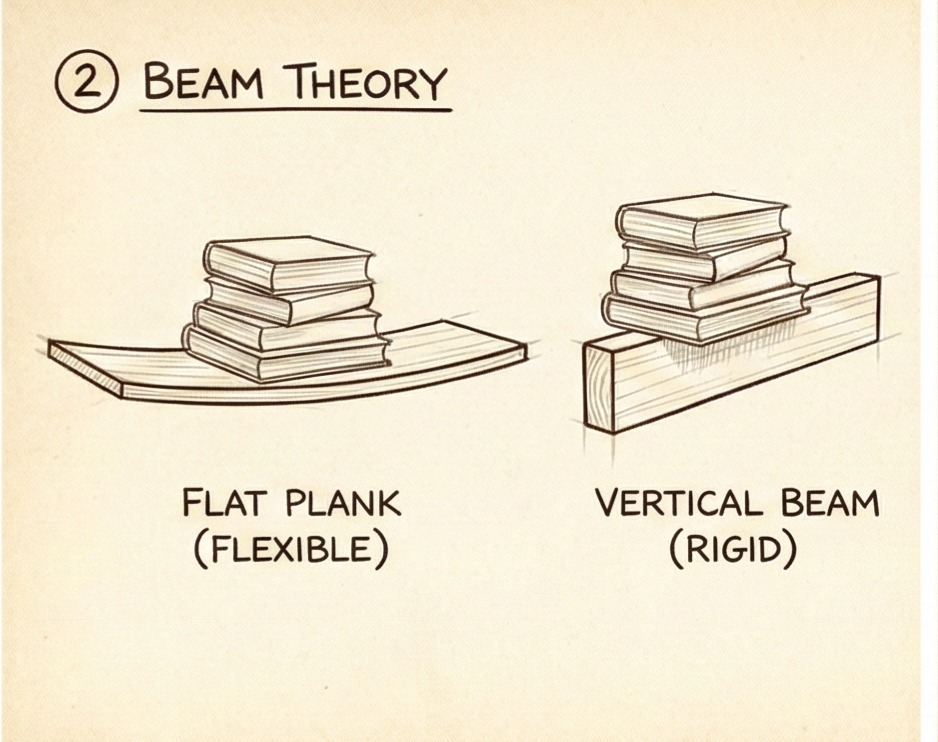
We have all seen cheap bookcases where the shelves bow in the middle. This happens because of a lack of “Beam Strength.” A flat board is flexible. If you take a standard 1×6 pine board and bridge it across two cinderblocks, you can easily bend it by pushing down in the middle. However, the laws of physics offer a simple solution.
The Rule: Stiffness increases with thickness (depth), not width.
If you take that same 1×6 board and turn it on its edge (90 degrees) so it stands tall, you could stand on it, and it wouldn’t bend an inch. You have turned a floppy plank into a rigid Beam.
How to Apply This to Design:
You don’t want to turn your bookshelf on its edge, or books would fall off. So, how do we use beam theory?
- The Apron: This is why tables have that skirt (apron) under the top. It isn’t just for looks. That vertical piece of wood acts as a beam to keep the tabletop from sagging and provides a sturdy place to attach legs.
- The Edging Strip: If you are building a bookshelf, glue a strip of solid wood (turned vertically) to the front face of the plywood shelf. This 2-inch strip acts as a beam, stiffening the entire shelf significantly.
Racking: The Woodworker’s Arch-Nemesis

If you learn only one word from this post, let it be Racking.
Imagine a simple square frame made of four pieces of wood pinned together at the corners. If you push the top corner sideways, the square collapses into a diamond shape (a parallelogram). This is racking.
Most cabinets, tables, and bookcases are essentially boxes or frames. Without reinforcement, they want to rack. If a table wobbles when you cut your steak, or a desk vibrates when you erase something, the structure is racking.
How to Stop Racking: The Power of Triangles
Geometry teaches us that a triangle is the only rigid polygon. You cannot change the shape of a triangle without breaking one of its sides. To stop racking, you need to introduce triangles into your squares. Here are the three classic ways to stabilize a structure:
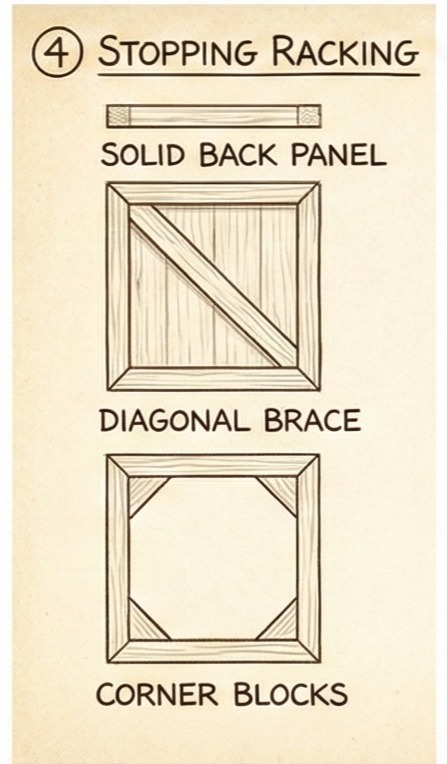
1. The Rigid Back Panel (The Cabinetmaker’s Secret)
If you build a bookshelf without a back, it will wobble side-to-side. The moment you nail a piece of plywood (or fit a solid wood panel) into the back, the wobble vanishes. The panel acts as one giant diagonal brace, preventing the corners from shifting out of square.
2. Stretchers and Rails
Let’s look at the Windsor Chair mentioned in our introduction text. It is a masterclass in structure.
- The legs are plugged into the solid seat.
- Horizontal stretcher rails connect the legs near the floor.
- These rails do two things: They prevent the legs from splaying out under weight (tension) and stop the legs from wobbling side-to-side (racking).
3. Corner Blocks
Look underneath a high-quality dining table. Inside the corners where the apron meets the leg, you will likely see a 45-degree block of wood glued and screwed in place. This small block turns the corner into a rigid triangle, reinforcing the structure against sideways pressure.
Analyzing Forces in Joint Selection
When you are designing, you can’t just pick a joinery method because it looks pretty. You must pick one that resists the specific forces at play.
Let’s look at the connection between a table leg and the table apron (the skirt).
The Challenge:
When you drag a table across a rug, the friction grabs the bottom of the feet. The momentum of the table keeps moving forward. This creates massive leverage on the joint at the top of the leg. A weak joint will snap instantly here.
The Solutions:
- The Mortise and Tenon:
This is the gold standard. A tongue (tenon) on the apron fits into a hole (mortise) in the leg.
- Why it works: It has Shoulders. The vertical cut of the apron rests flat against the leg. When the leg tries to twist, the wood of the apron shoulder physically hits the wood of the leg, preventing movement. The mechanical shape does the work, not just the glue.
- The Dowel Joint:
Round wooden pegs are inserted into matching holes.
- Why it works: Dowels provide a lot of surface area for glue and resist shear forces well. However, they lack the “shoulders” of a tenon, so they rely more heavily on the glue holding.

The “Try It” Experiment
You don’t need a woodshop to understand this. You can do it right now at your desk.
- Take a standard plastic ruler.
- Beam Theory: Hold it flat (numbers facing up) and bridge it between two books. Press down. It bends. Now, flip it on its edge. Press down. It’s rock solid. You just built a beam.
- Racking: Take a cardboard box (like a cereal box). Cut the top and bottom flaps off so you just have the four sides. Stand it up. Push it gently from the side. It collapses (racks). Now, tape one single piece of paper diagonally across the back. Push it again. It’s rigid. You just applied cross-bracing.
Conclusion: Engineering is Freedom
Understanding structure doesn’t limit your creativity; it liberates it.
When you know why a shelf sags, you can design a thinner, lighter shelf that uses a hidden beam to stay straight. When you know how a chair resists racking, you can build a chair that looks delicate and airy but supports a 250lb person with ease.
Don’t guess. If you are designing a piece, trace the path of the weight. Ask yourself:
- “What stops this from racking sideways?”
- “What stops this horizontal piece from sagging?”
- “If I drag this across the floor, what keeps the legs attached?”
Once you can answer those questions, you are ready to pick up a pencil.